Agricultural Literacy Curriculum Matrix
Lesson Plan
Types by Texture
Grade Level
3 - 5
Purpose
Students investigate soil texture and determine the texture of several soil samples. Grades 3-5
Estimated Time
1 - 1.5 hours
Materials Needed
Activity 1: Dirt Shake
- Soil samples brought in by students from home, cleaned of rocks, roots, etc. (about 1 cup)
- Quart jars
- Rulers
- Alum (optional)
Activity 2: Soil Textures By Feel
- Soil samples of sand, silt, clay, and local soil
- A Soil Sample Kit is available for purchase from agclassroomstore.com if local samples are not available.
- Dirt Shake handout
- Soil Texture Triangle handout
- Small bowls
- Spoons
- Water
- Bucket
- Newspaper
Vocabulary
clay: the smallest of the three soil particle sizes; measuring less than 0.002 mm
loam: ideal garden soil that has a well-balanced mixture of sand, silt, and clay
sand: the largest mineral soil particles, measuring between 2.00 and 0.05 mm
silt: sedimentary material composed of fine mineral particles in size between sand and clay
Did You Know?
- Almost all the food you eat, the fiber used to make your clothing, and lumber to build homes is produced by soil.1
- One shovelful of soil can contain more species of living things than live in the Amazon rain forest above the ground.1
- 6 billion bacteria species can be found living in a cup of soil.1
- Farmers use conservation techniques and practices to help maintain fertile soil for planting crops.1
Background Agricultural Connections
Soil is the foundation of agriculture. Farmers know that different soils are suitable for different crops, but how do they recognize what type of soil they have? Texture is an easily recognizable property that informs farmers about how to manage their soils. Soil texture cannot be changed, and it affects the movement of water and nutrients in the root zone of plants. Clayey soils hold water and nutrients, while sandy soils drain and dry out quickly. Farmers will make different decisions about irrigation, tillage, and what type of crop to plant based on the texture of their soil. With some practice anyone can learn to recognize different soil textures by feel.
Soil is made up of four components: air, water, organic matter, and mineral matter. The mineral component, made of tiny particles of rock, determines the texture of the soil. Soil particles are categorized according to their size as sand, silt, or clay. Sand is the largest category, including particles that measure 2.0 to 0.05 mm. Silt particles measure between 0.05 and 0.002 mm, and clay particles are less than 0.002 mm. (Most soils are a mixture of sand, silt, and clay.) When the three particles are present in approximately equal amounts, the soil is considered a loam. A soil that has more sand in it is a sandy loam, one with more silt is a silty loam, and one with more clay is a clay loam. The Soil Texture Triangle provides standardized soil textural classes based on the relative quantities of sand, silt, and clay particles in a soil.
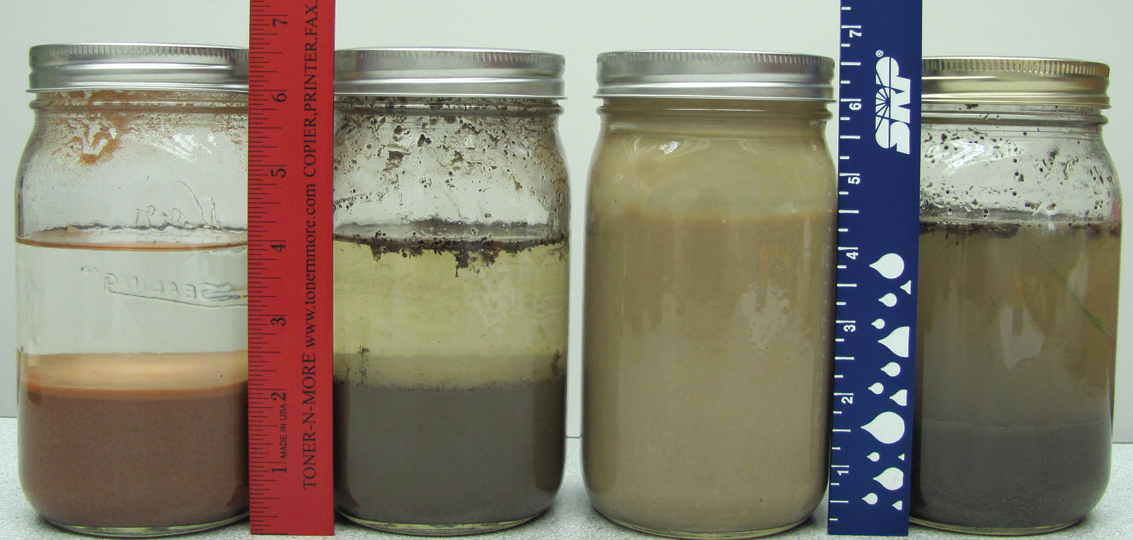
The first activity in this lesson is a “hydrology test” that uses water to separate soil particles. This is a quick, simple method to assess soil texture. Sand is the largest, heaviest, and most dense particle, so it will settle out of the water first—within one minute. Silt, the next largest particle, will settle out in three to four hours, and clay will take days to completely settle. The layers may be easy or difficult to see, depending on the mineral composition of the soil. Soil color is not directly related to texture. Some red soils have a greater fraction of clay particles than others. Scientific laboratories shake soil samples in water for 24 hours to ensure that tiny clay particles are thoroughly separated. Two minutes of shaking is sufficient for a classroom experiment, and alum can be added to improve separation. Organic matter will separate out as debris floating on top of the water. Soil texture is based on the mineral component of the soil and does not include organic matter.
When texturing soil samples by hand, students should use the following criteria: sand feels gritty; silt feels smooth, soft, and somewhat slick, like the smooth silkiness of baby powder; clay feels sticky and often stains the fingers. Soil samples containing a lot of clay can be pressed together through the thumb and forefinger to create a "ribbon" of soil. If the soil doesn't contain much clay, the ribbon will break before it gets very long. Clay soils stick together. This can also be demonstrated by forming a ball out of the soil and testing how much pressure is needed to break the ball-sandy soils will break apart easily, clay soils will resist breaking. many people are familiar with pottery clay. Clay soil is stickier than pottery clay but will hold together in a similar fashion. You cannot determine soil texture by color or where it is found in the soil profile, but by feeling the soil or conducting the simple hydrology test described here, you can easily identify the texture of a soil.
Engage
- Start a conversation about soil with your students. Ask the following questions to build interest.
- What forms of life does soil support? (plants, bacteria, insects, earthworms, crops)
- Name a function of soil that plants depend upon? (medium for plant growth, transports nutrients & water, anchors roots)
- Do all soils look the same, feel the same, and contain the same nutrients? (no)
- How do farmers find out what nutrients are missing in the soil before planting their crops? (take soil samples and have them analyzed in a laboratory)
- What environmental factors play a role in determining soil types? (mineral material, time of formation, climate, landscape position, organisms)
Explore and Explain
Activity 1: Dirt Shake
- Divide the students into groups of three or four. Provide each group with a soil sample or instruct each group to use one of the samples brought from home. Two notes:
- This activity will not work with most potting soil. Soil texture is an evaluation of the mineral component of soil; potting soil is mostly organic matter.
- Remove rocks, roots, and anything else that is clearly not soil from samples and break up any large clumps before beginning.
- Provide each group with a quart jar. Instruct the students to place 2" to 4" of soil into the jar, measure the level of soil, and record the measurement as "total soil." It's important to measure and record the depth you start with so that you can accurately estimate the sand, silt, and clay fractions.
- Add water until the jar is two-thirds to three-fourths full. Add one teaspoon of alum (found on the spice aisle of most grocery stores; it does help the soil settle faster, but is not necessary). Be sure the lid is tight.
- Shake the jar vigorously until all the particles have been separated by the water, about two minutes. Set the jar down, and allow the soil to settle.
- After 1 minute, measure the amount of soil on the bottom of the jar. Record this measurement and label it as the “sand fraction.” Share the Dirt Shake and Soil Texture Triangle handouts with the students.
- Allow the sample to settle for 3 to 4 hours, then measure again and record the level. This second layer indicates the silt fraction of your soil.
- The remaining clay particles may take as long as a week to settle depending on the composition of the sample. However, you can use the measurements you already have to determine the amount of clay in the soil. Simply subtract the combined sand and silt measurements from the total soil measurement as shown below. Organic matter will float on the surface of the water. Generally it is a small component that won’t affect your measurements, but if there is a floating organic layer large enough to measure, subtract its measurement from the total soil before calculating the clay fraction and before moving on to calculate percentages.
- Total soil = 2"
- Sand fraction (first layer) = 1"
- Silt fraction (second layer) = 1/2"
- Clay fraction (total soil - sand + silt)= 1/2"
- Now convert the measurements into percentages as shown here:
- Sand percentage (sand/total soil x 100) = (1 ÷ 2) x 100 = 50%
- Silt percentage (silt/total soil x 100) = (1/2 ÷ 2) x 100 = 25%
- Clay percentage (clay/total soil x 100) = (1/2 ÷ 2) x 100 = 25%
- Once you know these percentages, use the Soil Texture Triangle handout to determine the name of the soil type.
- Discuss the following questions:
- Why do the larger particles settle out first?
- What is the stuff floating in the jar?
- How does each person's sample compare?
Activity 2: Soil Textures By Feel
- Place four soil samples of at least three different textural types (sand, silt, clay, and loamy) into four separate bowls. Samples of sand, silt, and clay can be obtained from agclassroomstore.com.
- Note: Samples can be reused if allowed to dry after each use. In each subsequent use, the samples can be moistened to a paste and textured as explained. To show students what the soils look like dry, use a mortar and pestle (a wooden dowel or carriage bolt and plastic bowl will work) to pulverize the sample to its original loose state.
- Share the Soil Texture Triangle handout with students. Show them that there are different names for different types of soil. It will be the task of your students to determine the texture of the supplied soil samples.
- Explain how the different soil textures feel using the information found near the end of the Background section. Tell the students that they will be determining the texture of each soil sample by feeling it. Explain that each sample is different.
- Moisten soils to the consistency of “pasty” mud. Do not get them too wet.
- Divide the class into groups of four. Invite each group, one at a time, back to the table where the soil samples are set up in the bowls on newspaper.
- Note: You may want an activity for students to do independently at their desks while waiting for their turn with the soil samples. Four soil-themed activity sheets are attached for this purpose. The teacher should try to remain with the texturing group as much as possible to guide them through the activity and answer questions.
- Each student should place about a teaspoon of the "mud" into the palm of his or her hand. Instruct students to rub the soil between their index fingers and thumbs, feeling for the presence of sand, silt, and clay. Two notes:
- Hands must be rinsed between samples to prevent the samples from being contaminated and changing the feel, which will confuse the next students who use the samples.
- To avoid a mess, cover the entire working surface with newspaper and place a bucket of water in the middle of the table for rinsing hands. Have paper towels available. As much of the sample as possible should be returned to the sample bowl before rinsing hands.
- As they continue to feel the samples, ask students to evaluate how much sand, silt, or clay is present. Students should record their analysis of the soil based on the names provided in the Soil Texture Triangle.
- After all students have felt and examined the soils, discuss their findings and tell them the actual textures of the samples.
- Discuss the following questions:
- What is the name of a soil that contains a mixture of sand, silt, and clay?
- How do sand, silt, and clay feel? How can you tell them apart? What are their similarities and differences?
Elaborate
-
Play the My American Farm interactive game Thrive.
-
Contact the Cooperative Extension office located in your school's district and invite an agronomist to discuss with your class the soil's nutrient requirements farmers are faced with when planting and growing crops.
-
For more activities demonstrating the difference in particle sizes, see the Soil Texture and Water Percolation lesson plan.
-
Connect this lesson to Utah Studies by showing students the 14-minute video Dust Bowl: Grantsville Utah. This short documentary includes interviews from Utah residents who experienced the Grantsville Dust Bowl in the 1930s. Yes, Utah did experience its own dust bowl, but the cause was overgrazing rather than the turn of the plow.
Evaluate
After conducting these activities, review and summarize the following key concepts:
- All soils consist of particles of sand, silt, and/or clay.
- Soil textures can be identified by touch or through a laboratory test.
- Soil texture affects the water holding capacity and nutrient content of soils.
- Farmers identify the texture of their soil and manage it according to the needs of the plants they grow.
Sources
- http://www.blm.gov/nstc/soil/Kids/index.html
Recommended Companion Resources
Author
Debra Spielmaker
Organization
Utah Agriculture in the Classroom
 |
We welcome your feedback! If you have a question about this lesson or would like to report a broken link, please send us an email. If you have used this lesson and are willing to share your experience, we will provide you with a coupon code for 10% off your next purchase at AgClassroomStore. |