 Relevancy and Engagement
agclassroom.org
Properties of Soils (Grades 9-12)
Grade Level
9 - 12
Purpose
Students examine different types of soil that have been mixed with water and allowed to settle. Next, they work with a soil model to investigate its components (sand, silt, and clay) and learn how the properties of these components affect the passage or retention of water through the soil and the amount of air in the soil. Grades 9-12
Estimated Time
2 hours
Materials Needed
Engage:
- Potting soil
- Local soil
- 2 clear 12-20 oz plastic bottles
- Water
Activity 1: Soil Columns
- Lesson Handouts:
- Master 2.1, 2.2, 2.3, and 2.4, 1 copy per student printed front to back
- For each team of 3 students:
- 2 bubble tea or milkshake straws
- 2 pieces of coffee filter (approximately 3.5 cm2)
- Transparent tape, Permanent marking pen
- 2 plastic spoons for scooping sand and baby powder
- Sand**
- Baby powder****
- 2 cups (plastic, 8–10-oz cups [preferably clear] or beakers),
- 2 plastic drink cup lids*****
- 10 mL graduated cylinder
- Disposable pipet
- Stopwatch or timer
- Ruler
- Funnel (small end should fit inside straw; can be made by rolling up 1/4 sheet of paper)
- Water
Activity 2: Soil is Complex
-
-
Master 2.5, The Soil Triangle (1 to project)
-
Optional Extension Activity
-
-
Master 2.6, Soil Particle Size (1 to project)
-
* Bubble tea straws are optimal for this activity. You may also find them labeled as smoothie or milkshake straws. They have a larger diameter than a typical straw (3/8–1/2 inches [1–1.2 cm] diameter and 8–9 inches [20–28 cm] long). Some grocery stores carry these, and Asian food markets may be a good source. You can also purchase these online. If you have a choice, clear straws are best but may be harder to find. Clear with colored stripes also work. Colored straws can work (pastel colors are better than brighter colors), but it can be more challenging to see the water level in the straw because of the color. If you need to use the colored straws, sometimes a flashlight held behind straw can help make the waterline easier to see.
** Try to obtain coarse sand such as that used for home improvement products. Clean, fine sand may not allow water to pass as readily as most sands found in soils.
*** One alternative is using Feldspar, a powdered clay found at some craft or hardware stores. If your school has an art program that includes ceramics, you may be able to get a small amount of clay from the art teacher. You will need less than 1 pound (about the size of a baseball) of a stoneware clay (not too gritty). Other options for obtaining clay include an art supply store, a hobby supply store, or a local potter/ceramic artist. Please note the polymer “clays” that you cure in an oven will not work for this activity. You need a natural clay.
**** Baby powder is used as a substitute for silt because it is easily obtained and because it has particles approximately the same size as silt. Purchase plain baby powder—not the kind with cornstarch included.
***** The drink cup lids are the kind you find at fast-food restaurants or convenience stores for fountain sodas. The size is not critical because the lids do not need to fit the cups or beakers that you use. The lids simply need to be large enough to rest on top of the cup and hold the straw in a vertical position. The hole in the lid may not be large enough for a wide, bubble tea straw. If that situation arises, gently use your finger to enlarge the hole (being careful not to make it so large that it will not hold the straw).
Vocabulary
infiltration: to pass through a substance by filtering or permeating
loam: ideal garden soil that has a well-balanced mixture of sand, silt, and clay
percolation: the movement of water within and through the soil
permeability: the ability of soil to allow the passage of water
porosity: the percentage of soil volume that is not occupied by solids
Did You Know?
- The primary components of soil include sand, silt, and clay.
- The particle sizes of sand, silt, and clay affect how water moves through soil.
- Soils vary in their compositions and contain both organic and inorganic matter.
- Soils contain differing amounts of air space.
- Soils are a bank of nutrients.
Background Agricultural Connections
Soil Formation
Most people take soil for granted. In fact, “soil” has a negative connotation. We call it dirt and wash it off our clothes and our bodies. In reality, soil is essential to our survival and that of nearly every organism on Earth. Our planet is mostly made of rock with an iron-nickel core. Plants and animals, including us, occupy a thin veneer on its surface. Our existence is possible because of a thin layer of soil that comes between the planet’s rocky interior and us.
Soils vary. They are natural expressions of the environment in which they form. Scientists recognize five main factors that influence soil formation: 1) parent material, 2) climate, 3) living organisms, 4) topography, and 5) time.
- Parent Material refers to both the organic and mineral material in which soil formation takes place. Mineral can include weathered rock, ash from volcanos, and sediments deposited by wind and water. Soil formation will happen more quickly in materials that are more permeable to water.
- Climate influences the amount of water available for weathering the parent material and the temperature at which it occurs. A warm, moist climate fosters plant growth and speeds up decomposition, both of which contribute to faster soil formation.
- Living Organisms. Plants supply soil with organic material and help prevent erosion. Deep-rooted plants have a greater impact on soil formation than shallow-rooted plants because they create larger channels for water movement. Insects, earthworms, fungi, and bacteria are important because they help decompose organic material releasing plant nutrients.
- Topography. The three dimensional shape of the land influences water movement and therefore the speed of soil formation. Since water flows downward due to gravity, soils on slopes are prone to erosion. Areas that are very wet or very dry may not be fertile and the resulting lack of plant growth can slow the rate of soil formation.
- Time. The weathering of rock slowly produces soils. Constant exposure to wind and rain cause the rocky crust to break slowly down into smaller particles. It can take centuries to produce fertile topsoil. As rainwater seeps into cracks, temperature extremes cause the water to freeze. The rock expands, contracts, and fractures. Organisms that live on and in the soil help these weathering actions along.
Of course, in addition to these five factors, human activity also can influence soil formation. Agricultural practices and urban development especially can interfere with the naturally occurring process of soil formation.
Soil Horizons
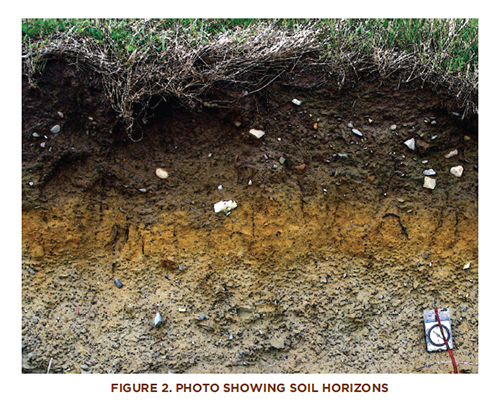
The gradual process of soil formation produces a series of horizontal layers. A soil horizon is a layer generally parallel to the soil surface, whose physical and chemical characteristics differ from the layers above and beneath. A given type of soil usually has three or four horizons. Horizons are characterized by the obvious physical characteristics of color and texture. The formation of soil horizons is influenced by factors such as air, water, sunlight, and plant material. The weathering of the parent material occurs first at the surface and then works its way downward. This means that the uppermost layers are changed (weathered) the most, while the deepest layers are the most similar to the original parent material.
To visualize the soil horizons, scientists dig a hole several meters deep to expose the layers. Most soils display a similar pattern of horizons. Each horizon is labeled with its own capital letter that identifies its place. A typical soil horizon sequence is described as O-A-B-C-R.
- O refers to organic matter that is relatively undecomposed and lies on the surface.
- A refers to organic material mixed with mineral that makes up the surface soil.
- B refers to the subsoil. This layer reflects the chemical and physical alteration of the original parent material.
- C refers to the parent material
- R refers to the bedrock. The R layer is mostly composed of hard rock that cannot be excavated by hand.
Soil Triangle
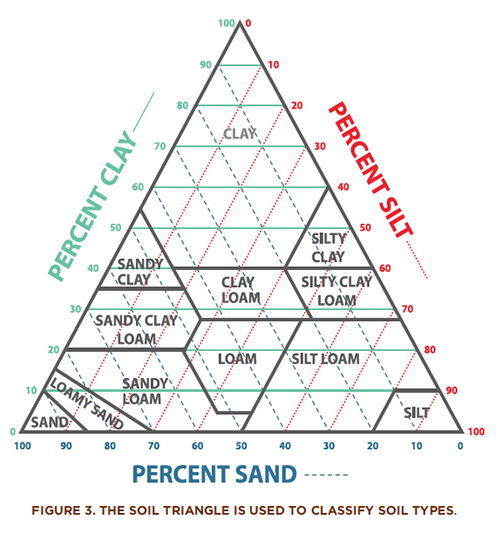
During soil formation, inorganic material is broken down by weathering into particles of various sizes. Soil texture refers to the relative proportions of different-sized particles found in the soil. Scientists classify soil particles into three categories. The smallest particles, which measure less than 0.002 millimeters, are called clay. Clay is important in holding nutrients. Clay particles form plate-like structures that attract and hold nutrients through chemical bonds. These nutrients can be displaced off the clay by another nutrient, absorbed by a plant root or soil microbe, or chemically absorbed into the clay particle itself. The next-largest particles are called silt. Silt particles range in size from 0.002 millimeters to 0.06 millimeters. Sand refers to the largest particles. Sand grains range in size from 0.06 millimeters to 2 millimeters. Soils vary in their proportions of clay, silt, and sand. Soil scientists classify different soil types using the soil triangle. Each side of the soil triangle represents the amount of a particle of a certain size—clay, silt, or sand. The relative amounts of these three soil components intersect within the triangle and determine to what type of soil those proportions correspond.
The ability of a soil to accept and retain water is largely determined by the relative amounts of clay, silt, and sand present. Porosity refers to spaces in the soil that can hold either air or water. Permeability is defined as the rate at which water can travel through soil. Table 10 lists properties of particle size that relate to soils’ interactions with water. Soils with desirable properties for farming are called loams. Loamy soils typically contain about 50 percent air space, which allows root systems to “breathe” (i.e., obtain O2 for respiration). The solid half of loamy soils is about 90 percent minerals and 10 percent organic material. Usually, loamy soils have names that more accurately reflect their composition, such as clay loam or silt loam.

Although the organic fraction of most soils is small in volume compared to the mineral fraction, it plays an important role in supporting plant growth. The organic material is composed of living organisms, plant roots, and plant and animal residue. A single gram of healthy topsoil may contain 100 nematodes (small roundworms), 1 million fungi, and 1 billion bacteria. Earthworms and a wide variety of insects may be present in smaller numbers. Organic material contains a significant amount of nutrients, and it, together with plant roots, helps
- decrease erosion;
- increase water infiltration and storage;
- act as a pH buffer (to maintain an acid-base balance);
- decompose organic material, releasing nutrients;
- recycle carbon, nitrogen, and other nutrients; and
- retain available nutrients such as metal ions.
The soil is a “bank” for nutrients that are taken up by plants, and these nutrients must be replenished for continued plant growth. Before the advent of modern agriculture, farmers relied solely upon tillage to break down existing organic material and release existing soil nutrients. This practice is still used in many less-developed countries.
Engage

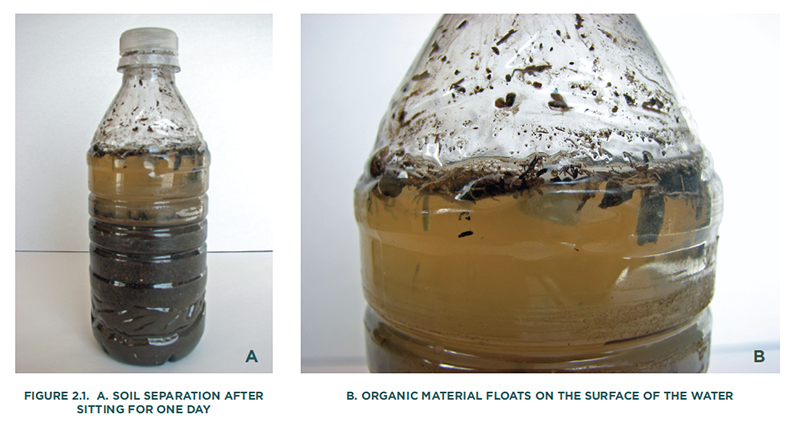
- To engage students in the lesson, prepare a soil separation demonstration for them to observe. At least 1 day before class, do the following:
- Obtain 2, clear plastic bottles (12–20-oz water or soda bottles) work well.
- Fill one bottle about 2/3 full of potting soil.
- Fill the other bottle 2/3 full of local soil.
- Add water to near the top of each bottle.
- Place caps on the bottles and shake the contents well.
- Place the bottles in a location where they will not be disturbed.
- At the beginning of class, remind students that essential plant elements are found in soil. Ask, “What is soil?” Write students’ responses on the board or chart paper. Accept all answers. Student responses may include ideas about soil containing rocks, sand, clay, insects, worms, bacteria, bits of wood, and water. If necessary, point out that these materials contain many of the essential elements.
- Ask students, “How would you categorize the components of soil?” Student responses will vary. Guide the discussion to bring out the fact that soil consists of nonliving inorganic material such as clay, silt, and sand as well as living and nonliving organic material such as dead plant material, bacteria, insects, and worms.
- Ask students, “How does soil help plants to grow?” Write student responses on the board. Student responses will vary. Guide the discussion to bring out the following:
- Soil provides support for plants’ root systems.
- Soil provides essential nutrients.
- Soil holds water and makes it accessible to plants.
- Soil contains air spaces, which is necessary for plant growth.
- Being careful not to shake or disturb the bottles, show the class the bottles of potting soil and local soil that were previously mixed with water and allowed to settle. Explain how they were prepared. Ask students to gather around the bottles and make observations about the different soils. Students will observe that the different soils separate differently. At this point, students will not know what is found in each layer. They should record their observations and refer back to them later in the lesson.
- The potting soil will show a thick layer of dark material on the bottom, a thick layer of cloudy water, and a thinner layer of organic material on the top.
- Local soils may differ, but a typical soil will show layering similar to potting soil though there may be less organic material floating on the surface.
- Remind students that soil contains both organic and inorganic material. Ask, “Can you identify the organic material in each container?” Responses will vary. If necessary, explain that the organic material is less dense than the inorganic material and floats on the surface of the water. If students are unfamiliar with the term “organic,” explain that organic material includes decayed matter from plants, animals, and insects.
Explore and Explain
Activity 1: Soil Columns
Students will learn how the composition of soil affects the percolation of water by setting up columns using sand and baby powder (to represent silt). The teacher will demonstrate the clay column.
- Prior to class, prepare one or more clay columns for a class demonstration.
- Explain to students that the major components of soil (in addition to the organic matter) are sand, silt, and clay. Inform students that they are going to be investigating these soil components and thinking about how they affect the properties of the soil.
- Ask students to work in teams of 3. Give each team 1 copy of the Water and Soil Properties handout (Masters 2.1 - 2.4). Briefly review the instructions with the students. Point out the second page of their handout titled, Column Setup, and tell students that this diagram illustrates how they will set up their soil columns. Inform students that they will be using baby powder as a substitute for silt. Make sure that students understand the procedure they should follow. Unlike clay or sand, it is difficult to obtain silt. As students will later learn, baby powder particles are about the same size as silt, making an appropriate substitution.
- Hold up a straw that is set up according to the same instructions but contains clay rather than sand or baby powder. Demonstrate adding water and beginning to time the process. The water will take quite a while to move through the clay. However, record the start time and allow students to watch for a few seconds before they move on. Make sure they understand that water will move more quickly through the other substances so they need to make sure that they pay attention when they start their experiments. Watch the clay column periodically to monitor the movement of water. Watch more closely when the water nears the bottom of the column so that you can record a finish time.
- Teacher Tip: As described in step 1, it is recommended to have more than one clay column for students to observe. Start them several hours before class starts. Record the start time for each column.
- Allow time for teams to work through their experiments. As teams work, circulate around the room to answer questions or to help resolve any difficulties that may arise.
- Teacher Tip: Students may feel that it is difficult to determine when all the water has moved through the column. For baby powder and clay, for example, water may collect at the bottom of the straw but not drip for up to several minutes. The important thing is for students to be consistent. For example, if drops have been falling at approximately 4-minute intervals and then nothing drips for about 10 minutes, students could use the time of the last drop as a cut-off point. As an alternative, to gauge how long it takes the water to move through the column, you could have students note the time at which they cannot see any water remaining at the top of the column. If you take this approach, ask all members of the class to use this same strategy in their measurements. Although this measurement may provide interesting data, if students find it difficult, they can skip this data and focus on the other categories of data collection.
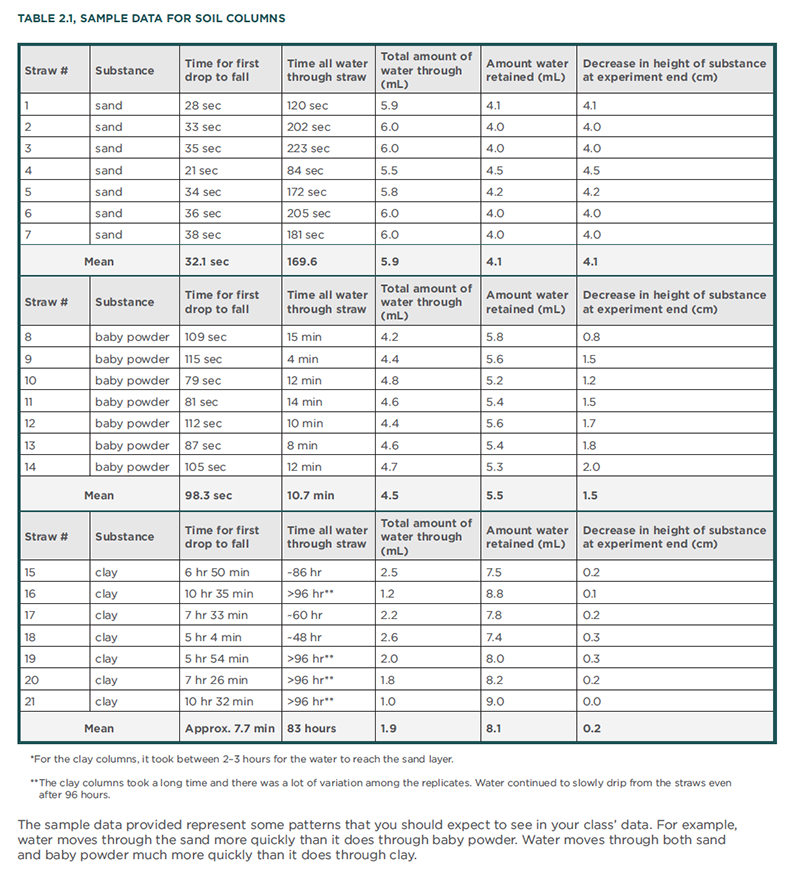
- After teams complete their investigations, make sure that each team adds their data to the class chart. Calculate the averages of the class data for time and water volume. Add data for the clay component as well.
- Students can work individually or in teams to calculate the averages.
- The data in Table 2.1 was collected during pilot testing of this lesson plan. You can use the data for the clay component for your class to analyze. The other data may provide interesting comparisons for your class data. It is important to note, however, that your data may be different because of differences between the straws, type of sand, and so forth.
- Have students turn to the third page in their handout titled, Making Sense of the Data. Allow time for students to work in their teams to answer the questions.
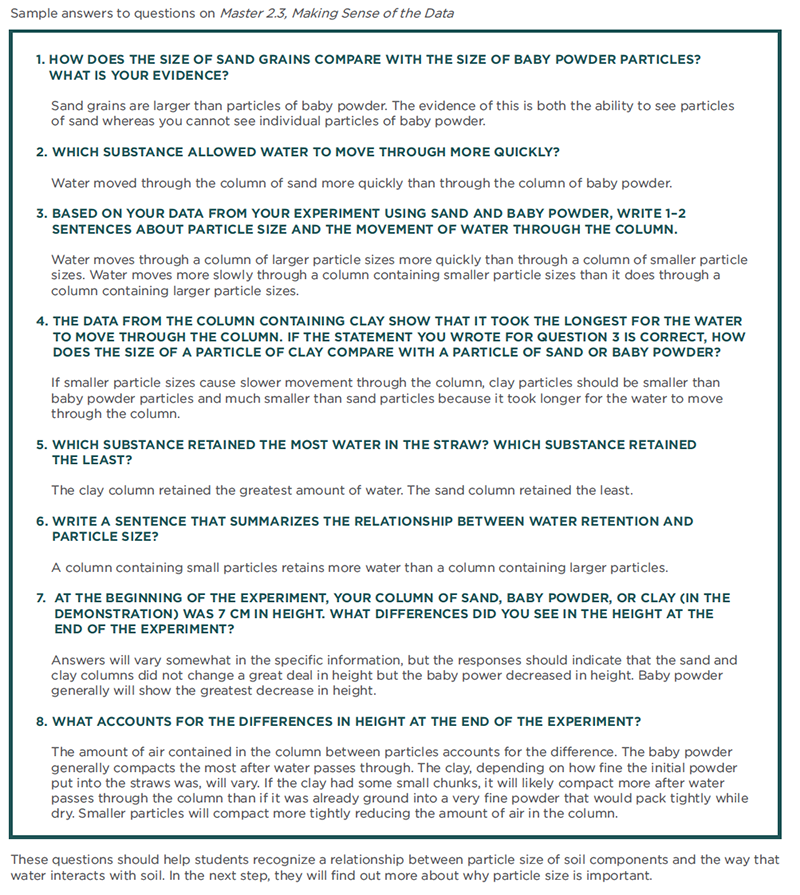
- Continue the discussion by asking students why they think particle size would change the way that water moves through soil or the amount of water retained in the soil. Student responses may vary. This is an opportunity to gauge student’s current thinking.
- To illustrate the relationship between surface area and particle size, work through an example with students about the surface area of a cube.
- Calculating surface area of a cube is simpler than calculating surface area of a sphere, but the basic principle is the same.
- Draw a cube on the board and indicate that each side is 10 cm long. The surface area of the cube is calculated using the formula
- Surface area = length x width x number of sides. For a cube that is 10 cm square , the surface area would be 10 x 10 x 6 = 600 cm2
- Now imagine that the same cube was cut into 8 smaller cubes (same total volume). Each cube would have sides 5 cm in length. The surface area of each small cube would be 5 x 5 x 6 = 150 cm2. However, when you calculate the total surface area for all 8 smaller cubes, you have a surface area equal to 150 x 8 = 1200 cm2. This means that the surface area to volume ratio increases as the size of the cube (or other particle) decreases.
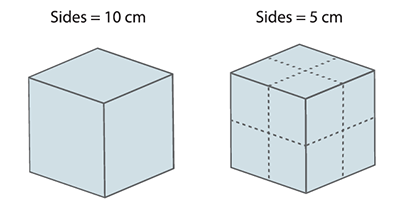
- Similar to cubes, a collection of smaller spheres would have a greater total surface area than a single large sphere.However, calculating the surface area of a cube is easier than calculating the surface area of a sphere. (Surface area of sphere = 4πr2<.)
- Students may have considered other examples of surface area related to other areas of science. For example, students may have thought about why single-celled organisms are small and why large organisms are multicellular. In large part, this is due to issues related to surface area. Large organisms must be multicellular (made up of many small cells) because very large cells would not have adequate surface area for processes such as gas exchange, and so forth.
- Help students continue to build their understanding by summarizing what they know so far. From their experiments, they learned that particle size was important for issues related to water movement and retention in soil components . They also now know that there is a relationship between particle size and surface area. Display a copy of Particle Size, Surface Area, and Water Movement. As a class, work together to indicate the relationships between these factors.
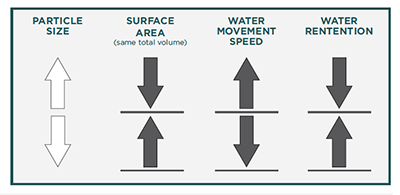
- Now that students understand the relationship between particle size, surface area, and water movement in the soil components, explain that a key factor in the movement of water through soil is friction. The force of gravity pulls the water downward, but the friction, which is related to surface area, causes resistance. Therefore, water moves more slowly through soils with smaller particle sizes (silt or clay).
Activity 2: Soil Is Complex
Students consider how soil is usually a mixture of the three major components (sand, silt, and clay) and the amounts of each component influences plant growth.
- Remind the students of the ways in which soil helps plants to grow.
- Soil provides support for plants’ root systems.
- Soil provides essential nutrients.
- Soil holds water and makes it accessible to plants.
- Soil contains air spaces, which are necessary for plant growth.
- Ask, “Based on what you learned about soil components (sand, silt, and clay), would any of these be ideal for helping plants grow?”
- This is an opportunity to assess what students remember from the previous activity. Students’ responses should indicate that some soil components (e.g., sand) do not hold as much water, which could be detrimental to plants. On the other hand, clay does not let water move through very quickly which could also be a problem if there is too much water in the soil for healthy plants. In addition, clay (once it is wet) does not contain much air space, which also could be problematic for plants; sand contains a great deal of air space, which in extreme cases could mean that there is not enough support for a plant’s roots.
- Explain that soils are not as simple as the individual components they used in their investigation. Soils are made up of a mixture of sand, silt, clay, as well as organic matter. Display a copy of Master 2.5, The Soil Triangle. Explain that it is used to classify the different types of soil. Point out that the soil triangle diagram is divided into 12 soil classifications based on the amount of sand, silt , and clay in the soil.
- You may want to point out the term “loam” to students. Loam is another word for a soil that includes an ideal mix of sand, silt, and/or clay for many crop plants. On the soil triangle, there are 12 categories of loam that are differentiated by the amount of each component the soil includes.
- Help the students learn to use the soil triangle by giving them a hypothetical soil to classify. Ask, “How would you classify a soil that contains 20 percent clay, 70 percent silt , and 10 percent sand. Demonstrate on the projected copy of Master 2.5 how students would determine that this soil sample would fall into the silt loam classification.
- Start by finding 20 percent clay on the left side and drawing a line horizontally across the triangle. Then find 70 percent silt on the right side of the triangle and draw a line for that percentage. Finally, draw a line for 10 percent sand from the bottom of the triangle. The intersection of these 3 lines will determine the soil classification.
- Ask, “In which category on the soil triangle do you think CROP plants would grow best and why?” Allow volunteers to share their answers but make sure they support their answers with information about soil properties that they learned previously.
- Answers will vary with respect to the specific type of loam that would be best, but they should include ideas that reflect what they have learned about water movement through soil, water retention, and air space. For example, an appropriate response might be “Soil with some sand would allow water to move through the soil and it would have more air space than clay or silt, but having some clay or silt would help the soil retain some water and provide more structure for the roots.” Students may realize that plants living in different environments or types of soil have different root structures.
- Conclude the activity by asking students how the soil triangle could be helpful to someone who is growing plants (either on a small scale such as an individual gardener or on a larger scale such as a farmer).
- If students have difficulty getting started, you might ask them to think about the situation of someone who wants to grow a plant in their garden but the plant does not do well because the soil is very hard and compacted. What does this mean about the soil and how might it be changed? Another situation relates to irrigation. In one location, a crop may need a certain amount of water to thrive. In a different location, irrigating with the same amount of water may be either insufficient or excessive because the properties of the soil are different.
- If you wish, this could be assigned for homework to allow students to do more research about situations in which knowledge of soil properties and the soil triangle may be beneficial.
Elaborate
Extension Activity: Digging Deeper into Soil (optional)
Students could use what they have learned in this lesson to design their own experiments to learn more about soil texture and its relationship to water movement through soil or to plant growth. Students could design additional experiments using the straw columns. For example, students could use this setup to investigate their local soil or potting soil. They could also design experiments in which they mix the sand, silt (baby powder), and clay to see how water movement changes. Students should make sure that they design (plan) their experiments carefully and include appropriate controls. They should also be clear about the data that they want to collect.
Another option would be to investigate how plant growth is affected by soil. For example, they could try growing plants in sand, silt (if available), or clay and compare with growth in local soil or potting soil. Again, students should design their experiments before they begin to ensure that the data will be meaningful (e.g., number of replicates, conditions in which plants will be kept, use of appropriate controls, and so forth). If students pursue either of these options, make sure they have a testable question and that the experiment will be tied to the concepts developed in this lesson. You can require students to have their experimental designs approved by you before they can begin.
Extension Activity: Particle Size (optional)
In this lesson, students used sand, baby powder, and clay for their columns and began to think about particle size. However, it can be very difficult for students to grasp the variation in size among these different particles. Display a copy of Master 2.6, Soil Particle Size. Use a ruler to emphasize that things over 75 mm are classified as rock and things over 2 mm in diameter are classified as gravel. Point out that it is more difficult to appreciate the size of the smaller particles since you cannot see individual particles. Ask students to come up with a way to represent the difference in sizes among clay, silt, and sand (smaller particle sizes of sand). Encourage students to use their creativity to think about how to visualize these relationships. For example, if a basketball represented a sand grain, what is something they could use to represent the size of a silt or clay particle? Ask students to include the calculations they used to identify objects that would be appropriately scaled.
This lesson is the second in a series of five related lessons. Refer to the following lessons for further depth.
Evaluate
After conducting these activities, review and summarize the following key concepts:
- Soils vary in composition.
- Particle size in soil is critical to the movement of water and nutrients through soil. The smaller the particle size, the slower the movement of water and nutrients.
Sources
- Nutrients for Life Foundation
- BSCS-Biological Science Curriculum Study
- Reviewed by Smithsonian Institution
Recommended Companion Resources
Author
Nutrients for Life Foundation
Organization
Nutrients for Life Foundation